VB and Java - Networking
Networking is a vast subject and it is a very significant branch of Information Technology. Most of the institutions and organizations manage their work through Networking. Internet itself is a result of Networking. This article describes the differences and approach of network programming in Java and VB.
Networking, basically is a technique to connect two or more PC’s through a common network so that the two PC’s can communicate with each other. The two PC’s can do anything in a network: Share Files, applications etc. But the most common thing that strikes to our mind is ‘Chatting’. Yes, chatting is a simple form of basic networking. And in this article, we shall learn to make a basic chat application in both VB and JAVA.
Before we begin, I must clarify here that ‘Networking’ in JAVA and VB are totally different from each other. Therefore, we would not be able to discuss both of them head-to-head. First, we will make it in VB and later in JAVA.
Networking in VB (Making a simple single user chat application)
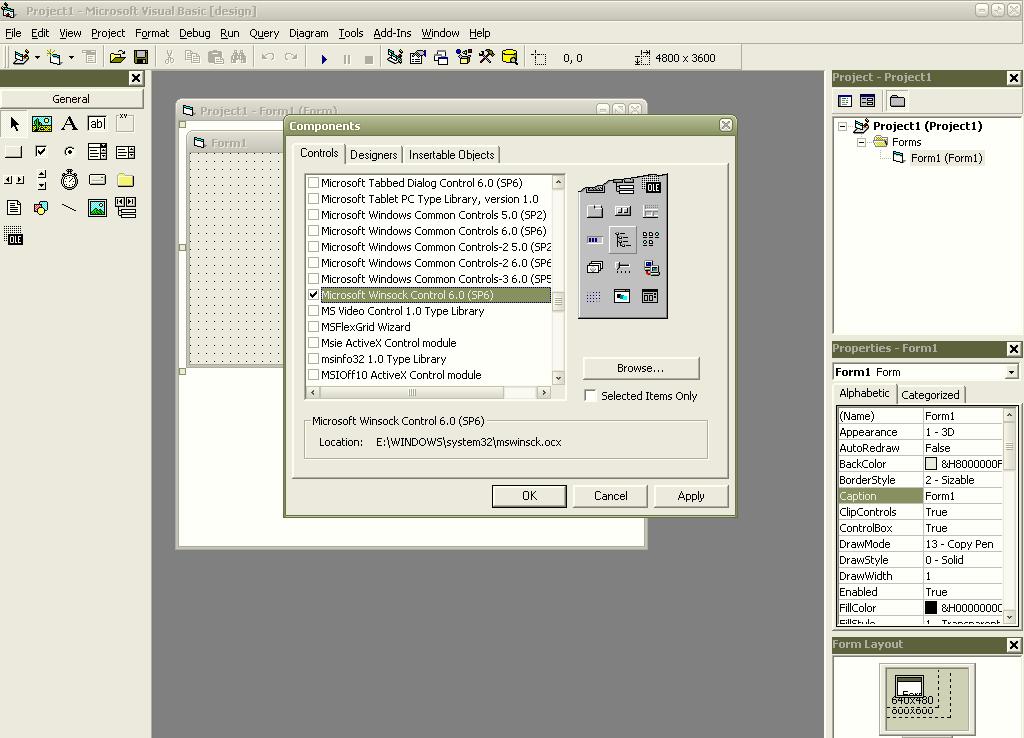
Networking in VB is quite simple as compared to JAVA. VB uses a control called ‘WinSock’ control to enable networking programming. You will have to add this control to the toolbox before you use it. Follow the following steps to add it to the toolbox:
- Select Project » Components
- Select ‘Microsoft WinSock Control 6 (version may be different on your PC, mine is 6)’ and put a checkbox in front of it.
- Press OK.
For your convenience, below is a picture of VB IDE on how to add this component.
Now, this component will be added to your toolbox as follows:
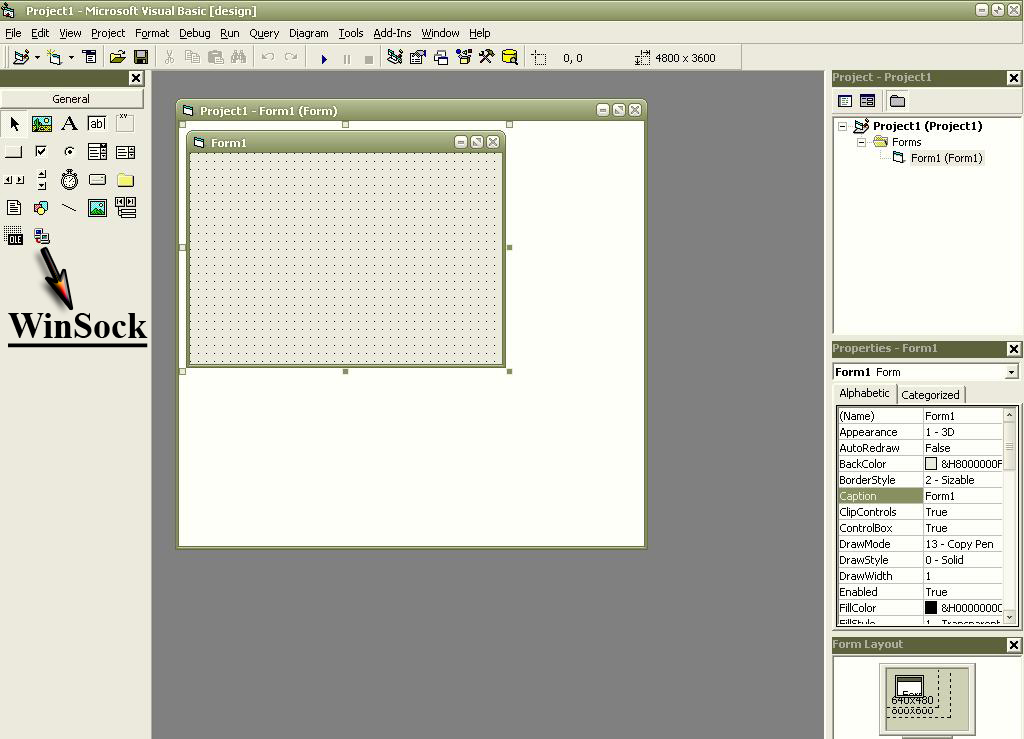
Now add this WinSock control to the form and rename it to ‘WS’.
That’s it, now you are ready to start writing the code. The chat application is divided into two separate applications: The ‘Server Application’ and The ‘Client Application’. Let’s have a look at the server application’s first.
Initializing the Server Application in VB
The server application is the central place where all the client applications can be connected to share data. The server application needs to be binded or registered with a valid host name or IP address and the Port so that later, the clients can find it out to establish a connection with it. As we are developing this application on a single PC, we would use the IP address ’localhost’ or ‘127.0.0.1’ which is the local address of every PC. The winsock control that we added to the form will be binded to a valid host name and port as follows:
WS.Bind 12345, "localhost"
WS.Listen
You can place this code in the form’s load event so that the server application is binded to an IP address and Port as soon as it is started.
The Winsock control uses it’s ‘Bind’ function to register the server application with a valid host and IP. The first parameter of the ‘Bind’ function is the port number (12345 in this case) and second parameter is the host address to which you want to bind the aapplication (localhost in this case). Then you need to call the Winsock control’s ‘Listen’ function so that the server application starts listening for the messages from the clients.
You will also have to write a code for the server to accept the connections from the clients. The WinSock control has an event called ‘ConnectionRequest’ which takes a ‘RequestID’ as a parameter. This event is triggered when a client requests the server to establish a connection with it. Below is the code that enables the server application to accept the connections from the clients:
Private Sub WS_ConnectionRequest(ByVal requestID As Long)
 If WS.State <> sckClosed Then
 WS.Close
 WS.Accept requestID
 End If
End Sub
We have written a complete ‘ConnectionRequest’ event above. It first checks if the Winsock control’s State is closed. If not, it closes the connection before accepting a connection. Then it accepts a new connection with the ‘Accept’ function and generates a unique ID for the client who has requested the connection.
Initializing the Client Application in VB
Initializing a client is just a one line task. Just place the following line un the form’s load event of the client application.
WS.Connect "localhost", 12345
The client application’s Winsock control uses it’s ‘Connect’ function to establish a connection to the server application. This function takes two parameters: First one as the name or address of the server application (localhost) in this case and the second one as the Port number on which the server is listening for messages (12345) in this case.
Exchanging data between the Server application and the Client application in VB
Now, comes the real part i.e. exchanging data (written text) between both the server and the client applications. That’s what makes it a chat application. Data sharing code is the same in both the server and the client applications and can be written as it is in both of them. For sending the data, you have to write a single line as follows:
WS.SendData (text to send)
This single line sends the data from the server to the client and from the client to the server. The Winsock control’s ‘SendData’ function is called to transmit the data. This function takes a string as parameter. This string is the message that you want to send. For e.g. If you want to send a text ‘Hye..Friend!How are you?’, then you will have to call ‘SendData’ function as follows:
WS.SendData "Hye..Friend!How are you?"
Now, this is all about sending the data. Now we come to receiving the data. Receiving the data is also quite simple and it is also applied as the same in both the server and the client applications. For receiving the data, we have to program the Winsock Control’s ‘DataArrival’ event. This event is triggered when the Winsock control receives the data from the other end. Below is the code for this:
Private Sub Winsock1_DataArrival(ByVal bytesTotal As Long)
 Dim dataReceived As String
 WS.GetData dataReceived
 MsgBox dataReceived
End Sub
This is a complete ‘DataArrival’ event. It first declares a variable of type string named ‘dataReceived’ and then places the data in ‘dataReceived’ string by calling Winsock control’s ‘GetData’ function. This function takes an object as parameter and then places the incoming data in that object. Finally, it displays a message box showing the message received from the other side.
So, that’s it. This is the simplest form of a single user chat application in VB. Click Here to download the source code.
Now we shall discuss the same in JAVA.
Networking in JAVA (Making a simple single user chat application)
Networking in JAVA is a little complicated as compared to VB. JAVA doesn’t have any control like VB’s Winsock control. Instead, all the implementation has to be written manually. Before you begin, you have to import the packages java.io and java.net in both the server and the client applications. JAVA has two techniques to make a networking application: Datagram based and Socket based techniques. We are using the socket based technique here. In socket based technique, the connection is established between the server application and the client application and then data is exchanged between both of them. The connection uses the ‘Socket’ class to make connections. As you can judge from the term ‘Socket’, it does exactly the same job as a normal socket does. But here, it connects the two applications. The whole process of connecting the two applications and exchanging data consists of four steps as follows:
- Initializing the applications.
- Connecting the applications through sockets.
- Setting up their Input and Output Streams so that they can receive and send the data through their streams.
- Processing their incoming and outgoing data. (Such as how to display the messages on the screen or doing some action through the messages etc)
Initializing the Server Application in JAVA
The server application can be initialized as follows:
private ServerSocket server;
server = new ServerSocket( 12345);
As this is a server, we need to use the ‘ServerSocket’ object here which takes a Port number as a parameter to which you want to bind the server application. With this line of code, the server is binded and initialized. Now, place the following lines to enable the server application wait for new connections from the clients and on their request, establish the connection.
private Socket socket;
socket = server.accept();
Now here we declare a ‘Socket’ object. Then we use the ‘ServerSocket’ object’s ‘accept()’ method to connect the sockets of the server and the client. Now, we can use this socket object to initialize the input and output streams to perform data exchange. We will show you this later as this procedure is same in both the server and the client applications.
Initializing the Client Application in JAVA
Initializing and connecting the client application to the server application is a one line game. Just write the following line of code:
private Socket client;
client = new Socket(InetAddress.getByName("localhost"), 12345);
Here we have declared a ‘Socket’ object and then connected it to the server application through it’s constructor. The ‘Socket’ object takes two parameters: First one is the name or address of the server on which the server application is running. Here we have to use the ‘InetAddress’ class which provides methods to access internet addresses. The second one is the Port number to which the server is binded and listening for connections.
Exchanging data between the Server application and the Client application in JAVA
So far, we have completed the two steps in a four step procedure. Now the last two steps which are common to both the server and the client: Setting the input and output streams and sending and receiving data through them.
As you know that we used the sockets to connect both the server and the client, we can use those ‘Socket’ object’s ‘getOutputStream()’ and ‘getInputStream()’ methods to initialize their streams to exchange data.
Based on the code written above for server initialization, the server’s streams can be initialized as follows:
private ObjectOutputStream output;
private ObjectInputStream input;
output = new ObjectOutputStream(socket.getOutputStream());
output.flush();
input = new ObjectInputStream(socket.getInputStream());
Based on the code written above for client initialization, the client’s streams can be initialized as follows:
private ObjectOutputStream output;
private ObjectInputStream input;
output = new ObjectOutputStream( client.getOutputStream() );
output.flush();
input = new ObjectInputStream( client.getInputStream());
You will see that both the code snippets are similar. I have written them separately in order to save you from confusion because the server is having a socket named ‘socket’ and the client is having a socket named ‘client’.
We need to initialize the streams and then provide their parameters as the streams of the socket through it’s ‘getOutputStream()’ and ‘getInputStream()’ methods. Don’t panic for ‘output.flush()’ statement as it is only for clearing the output stream. Though it has nothing to do with the connection establishment but it is still important to place at that location.
Now comes reading and writing the data through the streams. It is quite simple. Input stream’s ‘readObject()’ will be used to read the incoming data and Output streams ‘writeObject()’ will be used to send the data.
Below is the code for both the server and the client to send and receive data.
Sending
output.writeObject( String message ); output.flush();
Example:
output.writeObject("Hye Dear");
output.flush();
Receiving
String message;
message = ( String ) input.readObject();
System.out.print(message);
Explanation
We don’t think that any further explanation is required here. This code is quite simple. Just remember that while reading the data from the input stream, you have to keep in mind that data is in object’s form and you need to convert it to a string value by using ‘(String)’ keyword before the ‘readObject’ method. (This is a basic technique which comes under the ‘Data Conversion’ section)
It may be very difficult for you to make a chat application based on the above code as there are a number of exceptions that are thrown during this process and you have to provide their handling code.
There is also a very major point which is not covered above. As I explained earlier, the whole process of making a networking application is of four steps: Initializing, Connecting, Setting up the streams and sending/receiving data. Except the first step, the last three steps need to be written in a ‘while’ or ‘do while’ loop because these operations take place all the time the application is running. Imagine when you start a server application, it is waiting for a new connection. Once it gets a connection, it initializes streams and then continuously looks for incoming data and when gets it, processes it. From this, you can get an idea on how it has to keep working all the time and for that, using loops in the last three steps is very essential.
Source Files/Pre-requisites for JAVA
Click Here to download a complete sample of both the server and the client applications written in JAVA. This code has all the points that are missing in the above discussion including the ‘Exception Handling’ and applying the loops.
You will need Java Runtime Environment to be installed on your system in order to run this sample script. You will need WinZip (or WinRAR ) to decompress the the file. Before you go deep into the code, try running the applications first. There are two files ‘StartServer.bat’ and ‘StartClient.bat’. Run these files to start both the applications and then try to send messages from the server application to the client and from the client application to the server.


