VB.NET – Crystal Reports
Crystal Reports in VB.NET are a replacement of Data Reports in VB6. Report generation is done at design-time or at runtime. It is simple to design the report at design-time as the programming part is very less during design-time and you just have to follow the simple wizards. Whereas if you design the reports at runtime, you have to program it completely. We recommend that you design the reports at runtime. Though the programming part is more but you will have a full control over the report design, layout and it’s data sources. You will find many articles on designing the report at design-time and so we are going to discuss report generation at runtime in this article.
Report Generation
Report generation in VB.NET at runtime is divided into two steps:
- Create and save the report on the disk.
- Load the report and display it in the ‘CrystalReportViewer’ component.
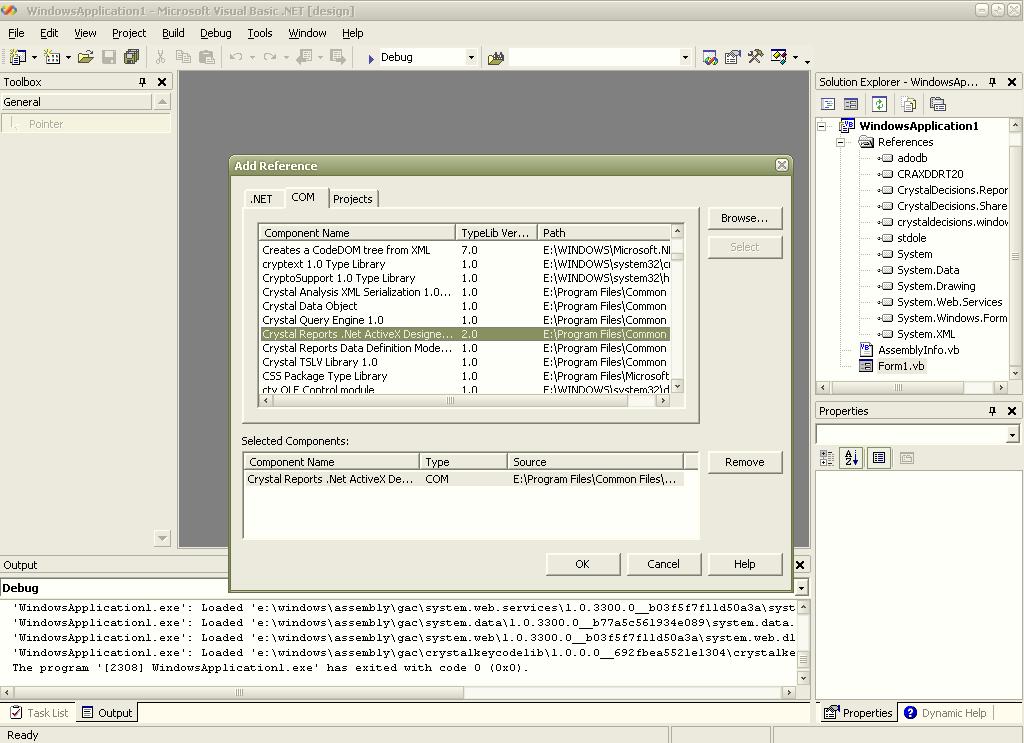
For creating and saving the report at runtime you have to add references of two objects: adodb and Crystal Reports .NET ActiveX Designer Design and Runtime Library
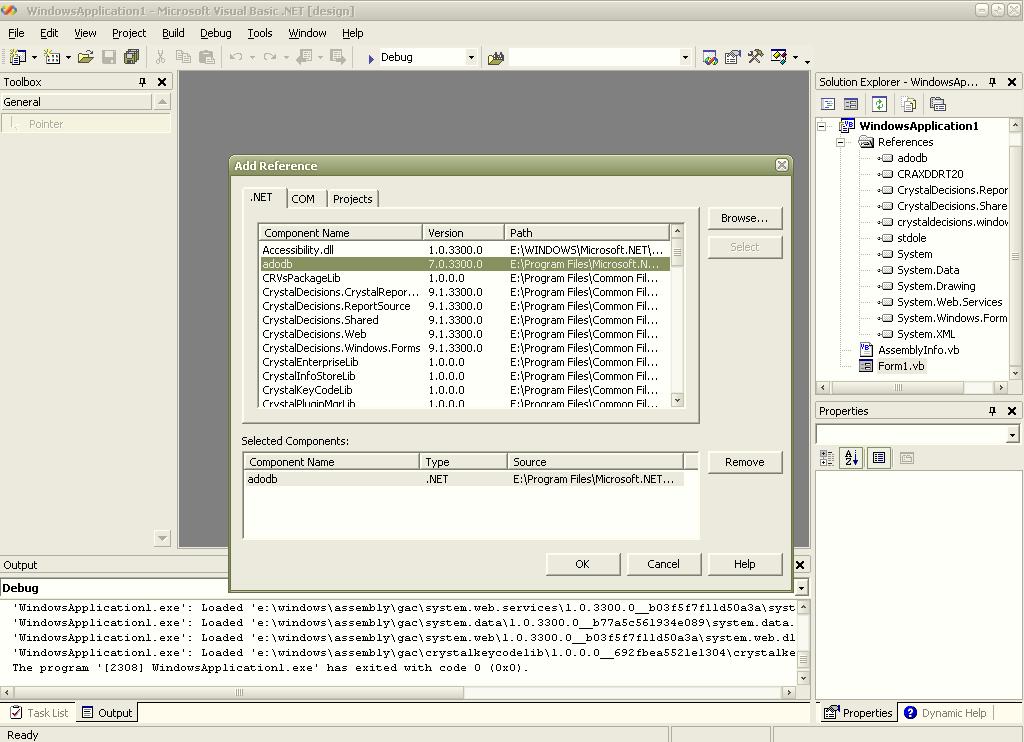
For adding a reference to adodb, follow the steps below:
- Select Project » Add Reference.
- Select .NET tab and double-click ‘adodb’ in the list to add it’s reference to the project.
For your convenience, below is a picture of VB.NET IDE on how to do this.


Now as you have added the references to the project, you can start writing the code for creating and saving the report.
Create and save the report
For creating and saving the report, you have to write the code as follows:
Dim Rep As CRAXDDRT20.Report
Rep = New CRAXDDRT20.ApplicationClass().NewReport

'Link to database
Rep.Database.AddOLEDBSource("Provider=Microsoft.Jet.OleDB.4.0;Data Source=d:/dbs.mdb", "Data")

'Setup the heading
Rep.Sections(1).AddTextObject("Report on the table 'Data'", 100, 200)

'Setup field names
Rep.Sections(2).AddTextObject("Name", 4000, 200)
Rep.Sections(2).AddTextObject("Age", 7000, 200)

'add field data objects
Rep.Sections(3).AddFieldObject(Rep.Database.Tables(1).Fields(1), 4000, 200)
Rep.Sections(3).AddFieldObject(Rep.Database.Tables(1).Fields(2), 7000, 200)

'Save report
Rep.SaveAs("D:\report.rpt", CRAXDDRT20.CRReportFileFormat.cr80FileFormat)
In this example, we are using the Microsoft Access Database named ‘dbs.mdb’ which is located in the root drive D. It has one table named ‘Data’ which has two columns named ‘Name’ and ‘Age’.
This code creates and saves the crystal report to drive D. You must know that the structure of a crystal report is almost the same as the structure of a Data Report in VB6.
Structure of a Crystal Report
Crystal Report is divided into sections on which controls are embedded.
- First section normally includes the header of the report.
- The second one includes the column names.
- The third section includes the data and the fourth one has footers.
This is the structure that we have created in the above code but the structure really depends upon the layout you choose.
Explanation of the code
The code first initializes a ‘Report’ object which lies in ‘CRAXDDRT20’ package. ‘CRAXDDRT20’ is the name for ‘Crystal Reports .NET ActiveX Designer Design and Runtime Library’ object.
Then it attaches a data source by calling ‘AddOLEDBSource’ function its ‘Database’ object. This function takes two parameters: First one is the ‘ConnectionString’ and the second one is the name of the table whose data you want to display.
We have added a text object to the first section of the report through ‘AddTextObject’ function to display the heading of the report . This function takes three parameters: First one is the text that you want to display, second one is its left location and third one is its top location. We have added two more text objects to the second section to display the names of the columns ‘Name’ and ‘Age’.
We have added field object to the third section. A field object is different from text object. A text object contains a text specified by you whereas a field object displays the text value of the column of the report’s data source. This object takes three parameters: First one is the field whose data you want to display in this field object. We have used these objects to display the data of columns ‘Name’ and ‘Age’ with their indexes as 1 and 2. The second one is the text object’s left location and third one is its top location.
Finally, we save the report to ‘D:/report.rpt’ through ‘Report’ object’s ‘SaveAs’ function. This function takes two parameters: First one is the name and path of the report where you want to save the report and second one is the format in which you want to save the report. You can choose from the two formats ‘CRAXDDRT20.CRReportFileFormat.cr70FileFormat’ and ‘CRAXDDRT20.CRReportFileFormat.cr80FileFormat’.
Loading and displaying the report
As we have created and saved the report, now is the time to load and display the report to the user through VB Form. VB.NET provides a control called ‘CrystalReportViewer’ which provides us the ability to display a saved report as well as reports generated at design-time. This control is in the toolbox and you have to place it from the toolbox to the VB Form. Place it on the VB Form and rename is to ‘CRV’. Once you do this, you just have to place this single line of code in either the form’s load event or any command button’s event as per your wish to display the report.
CRV.ReportSource = "D:\report.rpt"
This single line loads a report that we created and saved in “D:/report.rpt”.
Filtering records in a Crystal Report
The crystal report created above displays all the entries or records of a table in the database. But consider a situation where you want to display specific records in a report. For e.g. In the above report, you might be interested in displaying the name and age of only those persons who are 25 years of age. In a database, you use SQL queries to filter out the records but here, you will define a ‘SelectionFormula’ to filter the records. ‘SelectionFormula’ is an element of ‘CrystalReportViewer’ component and you can define it as follows:
CRV.SelectionFormula = "{Data.Age}='25'"
This line of code should be placed before defining the ‘ReportSource’ for the report. This code will filter out the records and display only the records where a person’s age is ‘25’ in the table named ‘Data’. You can use ‘AND’ or ‘OR’ operators to define multiple fields selection formula. For e.g.:
CRV.SelectionFormula = "{Data.Name}='John' AND {Data.Age}='25'"
This code will filter out entries where the person’s name is John and his age is 25.


